
Our Kitchen Makeover
I spend a lot of time in my kitchen. Not because I love cooking exactly, but because for the last two and a half years, I’ve been at home with my son (now sons) all day. I prepare three meals a day, clean up three meals a day, and make countless cups of coffee and toddler snacks. So I, like most home owners, care a great deal about my kitchen. Further, for those of us who love things that are well-designed, both aesthetically and functionally, kitchens have so much potential.
When we were house searching in 2015, I preferred homes with kitchens that needed an upgrade. While we did tour one house in Portage Park that had an upgraded kitchen that was perfect, in my opinion (a huge kitchen with beautiful, classic wood cabinets that matched the arts and crafts style of the home, complimented by beautiful light blue glass backsplash tile), most had dark cabinets with granite countertops. A lot of brown, black, and orangey colors, which screamed 2005 but didn’t seem old enough to justify tearing up for a new kitchen.
The kitchen in the house we chose to buy fit the kind of kitchen we were looking for. It was completely functional but needed an aesthetic fix. Something that we could handle ourselves, we hoped, without the budget of a huge kitchen remodel.
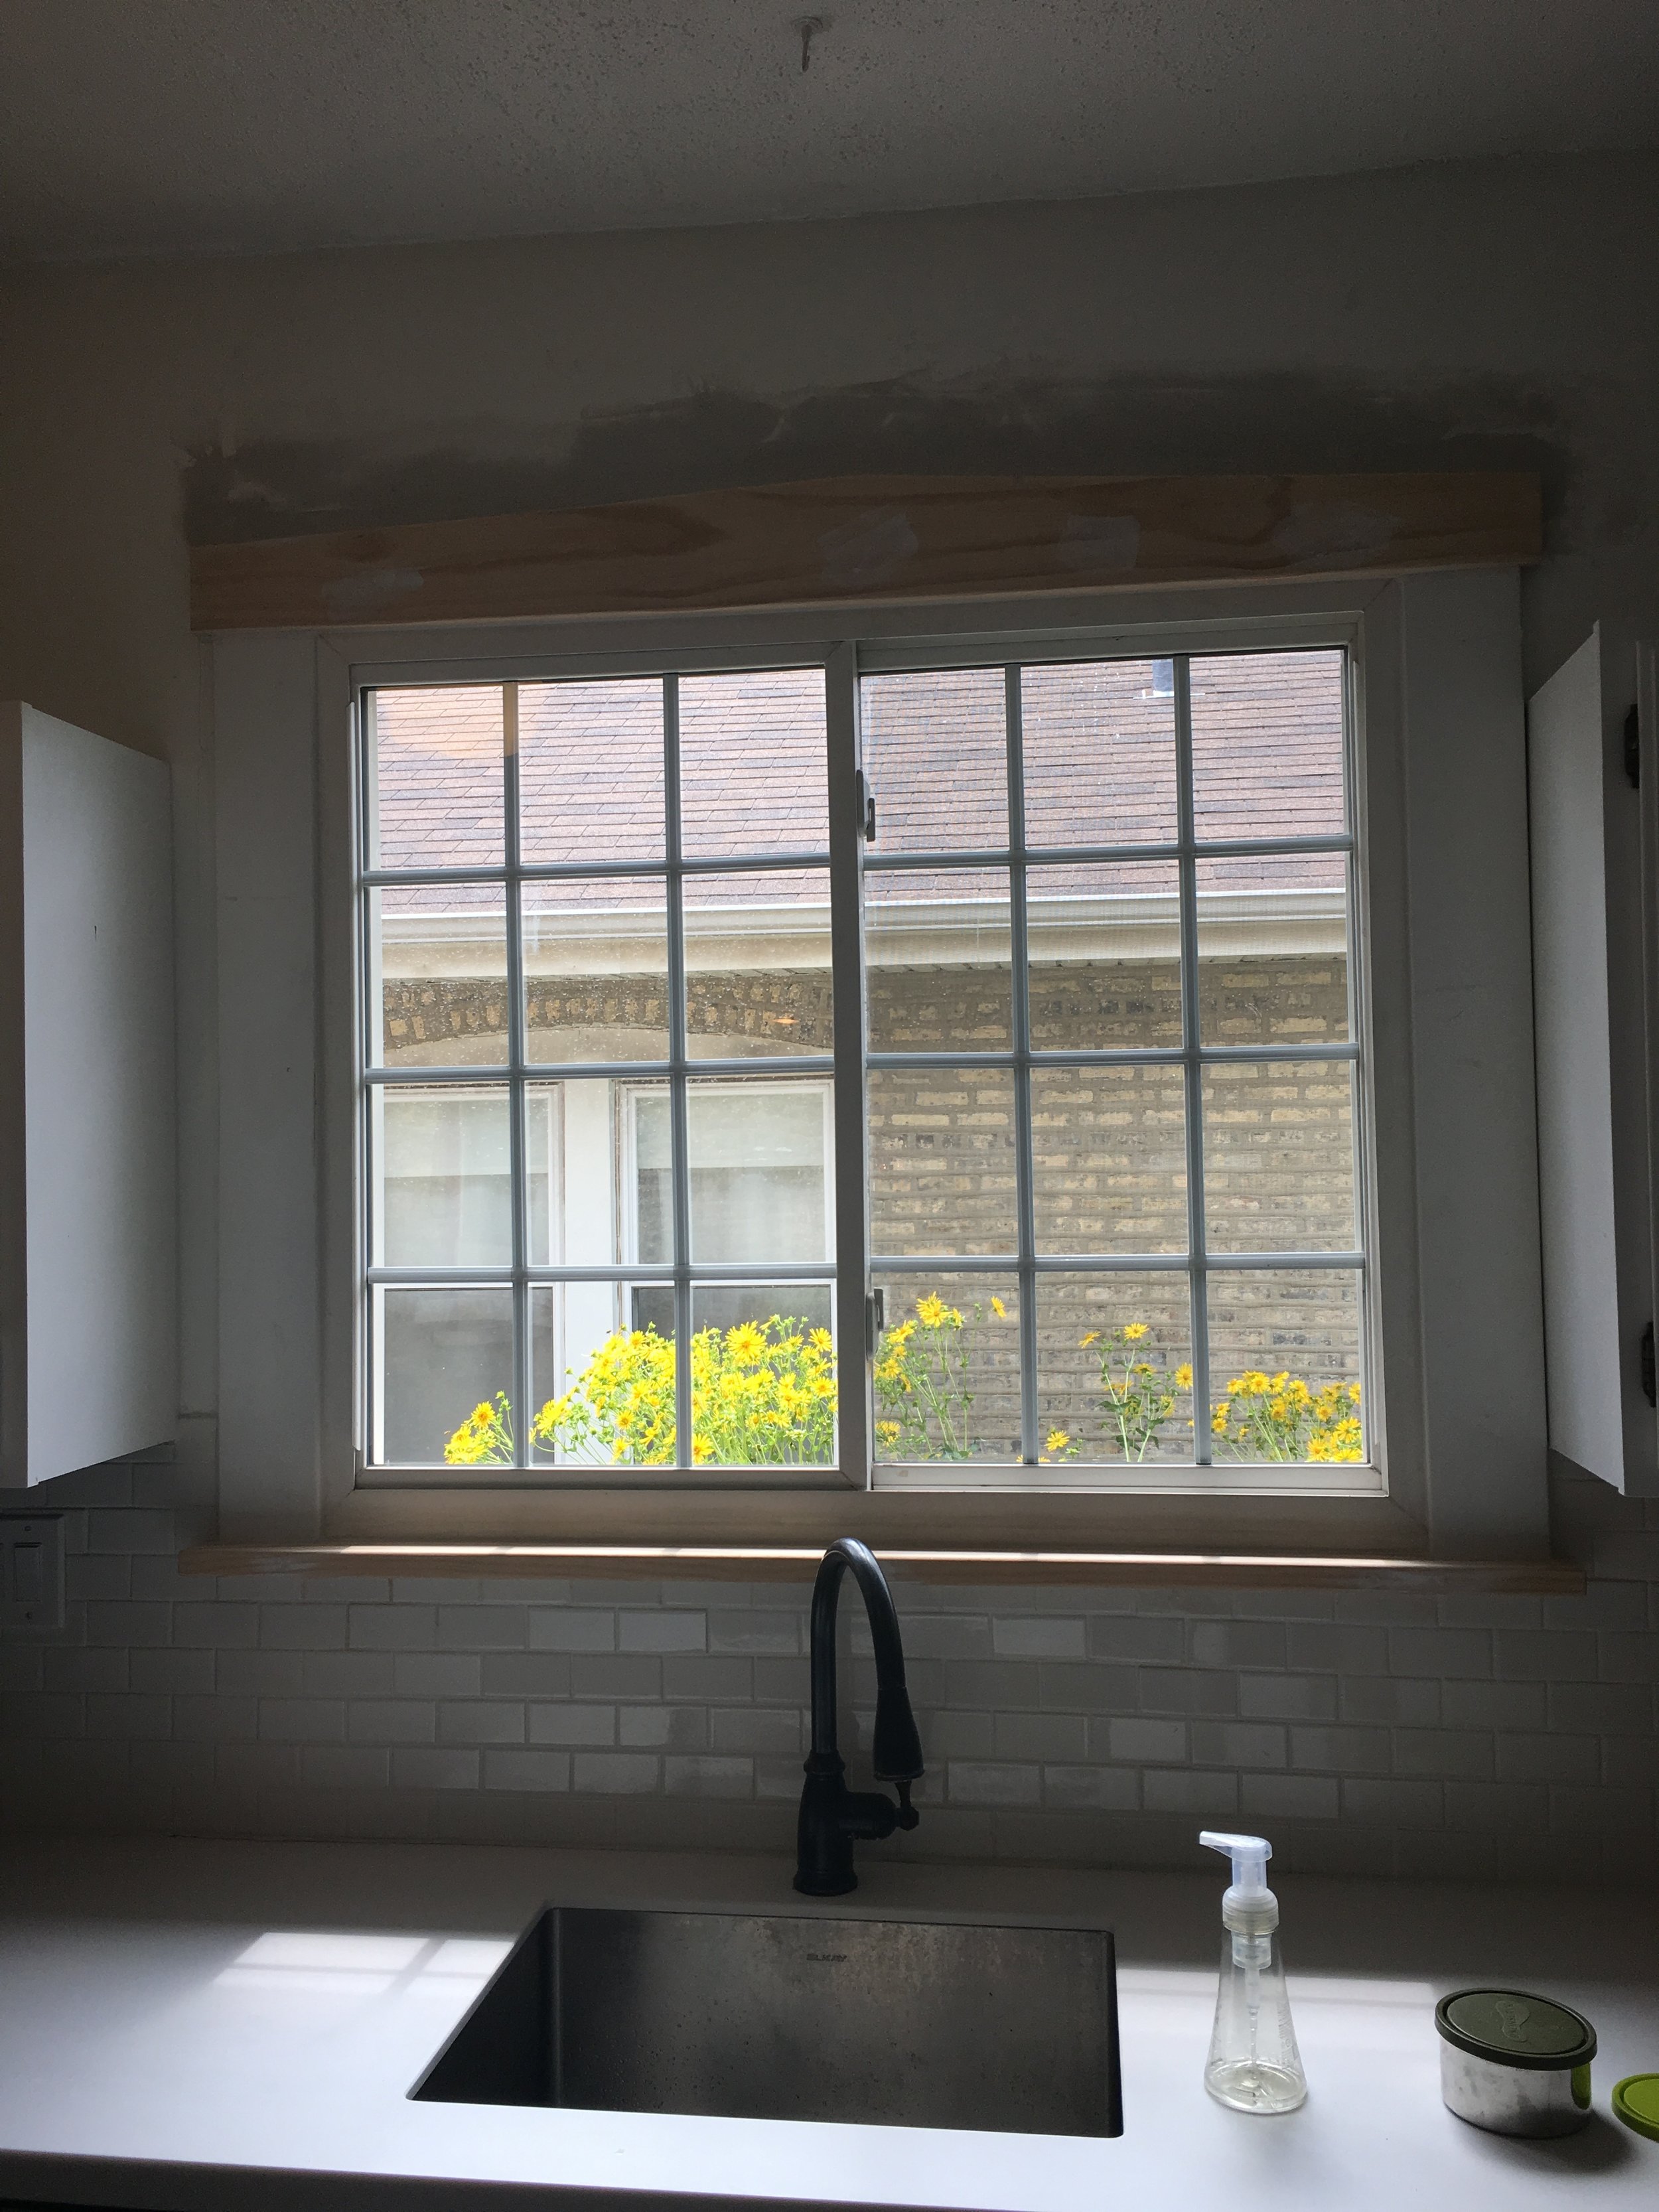
We lived with the kitchen as it was for about a year and a half. “As it was” included old laminate floors, green walls, dark stained cabinets, 12”x12” TILED countertops, and backsplash tiles that were accented with some fossil-style tiles above the range. We also had a white apartment-style range and a white microwave using up counter space.
But we also had a fantastic window that let in a ton of light, almost the right amount of cabinets, a decent fridge we were happy with, and a pass-through/island type counter space (though it was a brown granite material).
We tackled a lot of other spaces in our home first, but eventually the kitchen was really gnawing at me. The green walls looked ridiculous next to our blue dining room. The countertops were awful, and the floor and fossil tiles were, too. I obsessed over what we could do for months, poring over Pinterest for inspiration, and we started on the process of updating about a year and a half after moving in. The redo happened in 3 phases that spanned about 10 months, although honestly we just this fall completed the final finishing touches.

Our kitchen, before.
We began in fall 2016 with replacing the floor. The rest of our house is a blond-stained wood. When we pulled up the floors in the kitchen, there was wood beneath, but it was not stained in the same finish. At the time, I wasn’t crazy about the blond stain, so I didn’t want to match the floor in the kitchen to something I didn’t love (although now I love the brightness it brings to our home. Learn to love it!). So we needed a floor that could transition well to the wood. We went with a concrete-style 12"x24" porcelain tile, which we also brought into the small powder room off the kitchen. We are so fortunate that my dad is a DIY king and somehow knows how to do all house projects. He led the effort, with Alex learning along the way, and together they completed a beautiful floor installation.

Alex preparing the floor for the tiles

The completed floor
At that time, we also added a large pantry-style cabinet to the kitchen. Previously, this little corner of our kitchen held a glass door cabinet from Ikea that housed cookbooks and a few dishes and food items. Adding the pantry allowed us to house all food items in one space more neatly, and we were able to use the existing cabinets for dishes and other kitchen items.
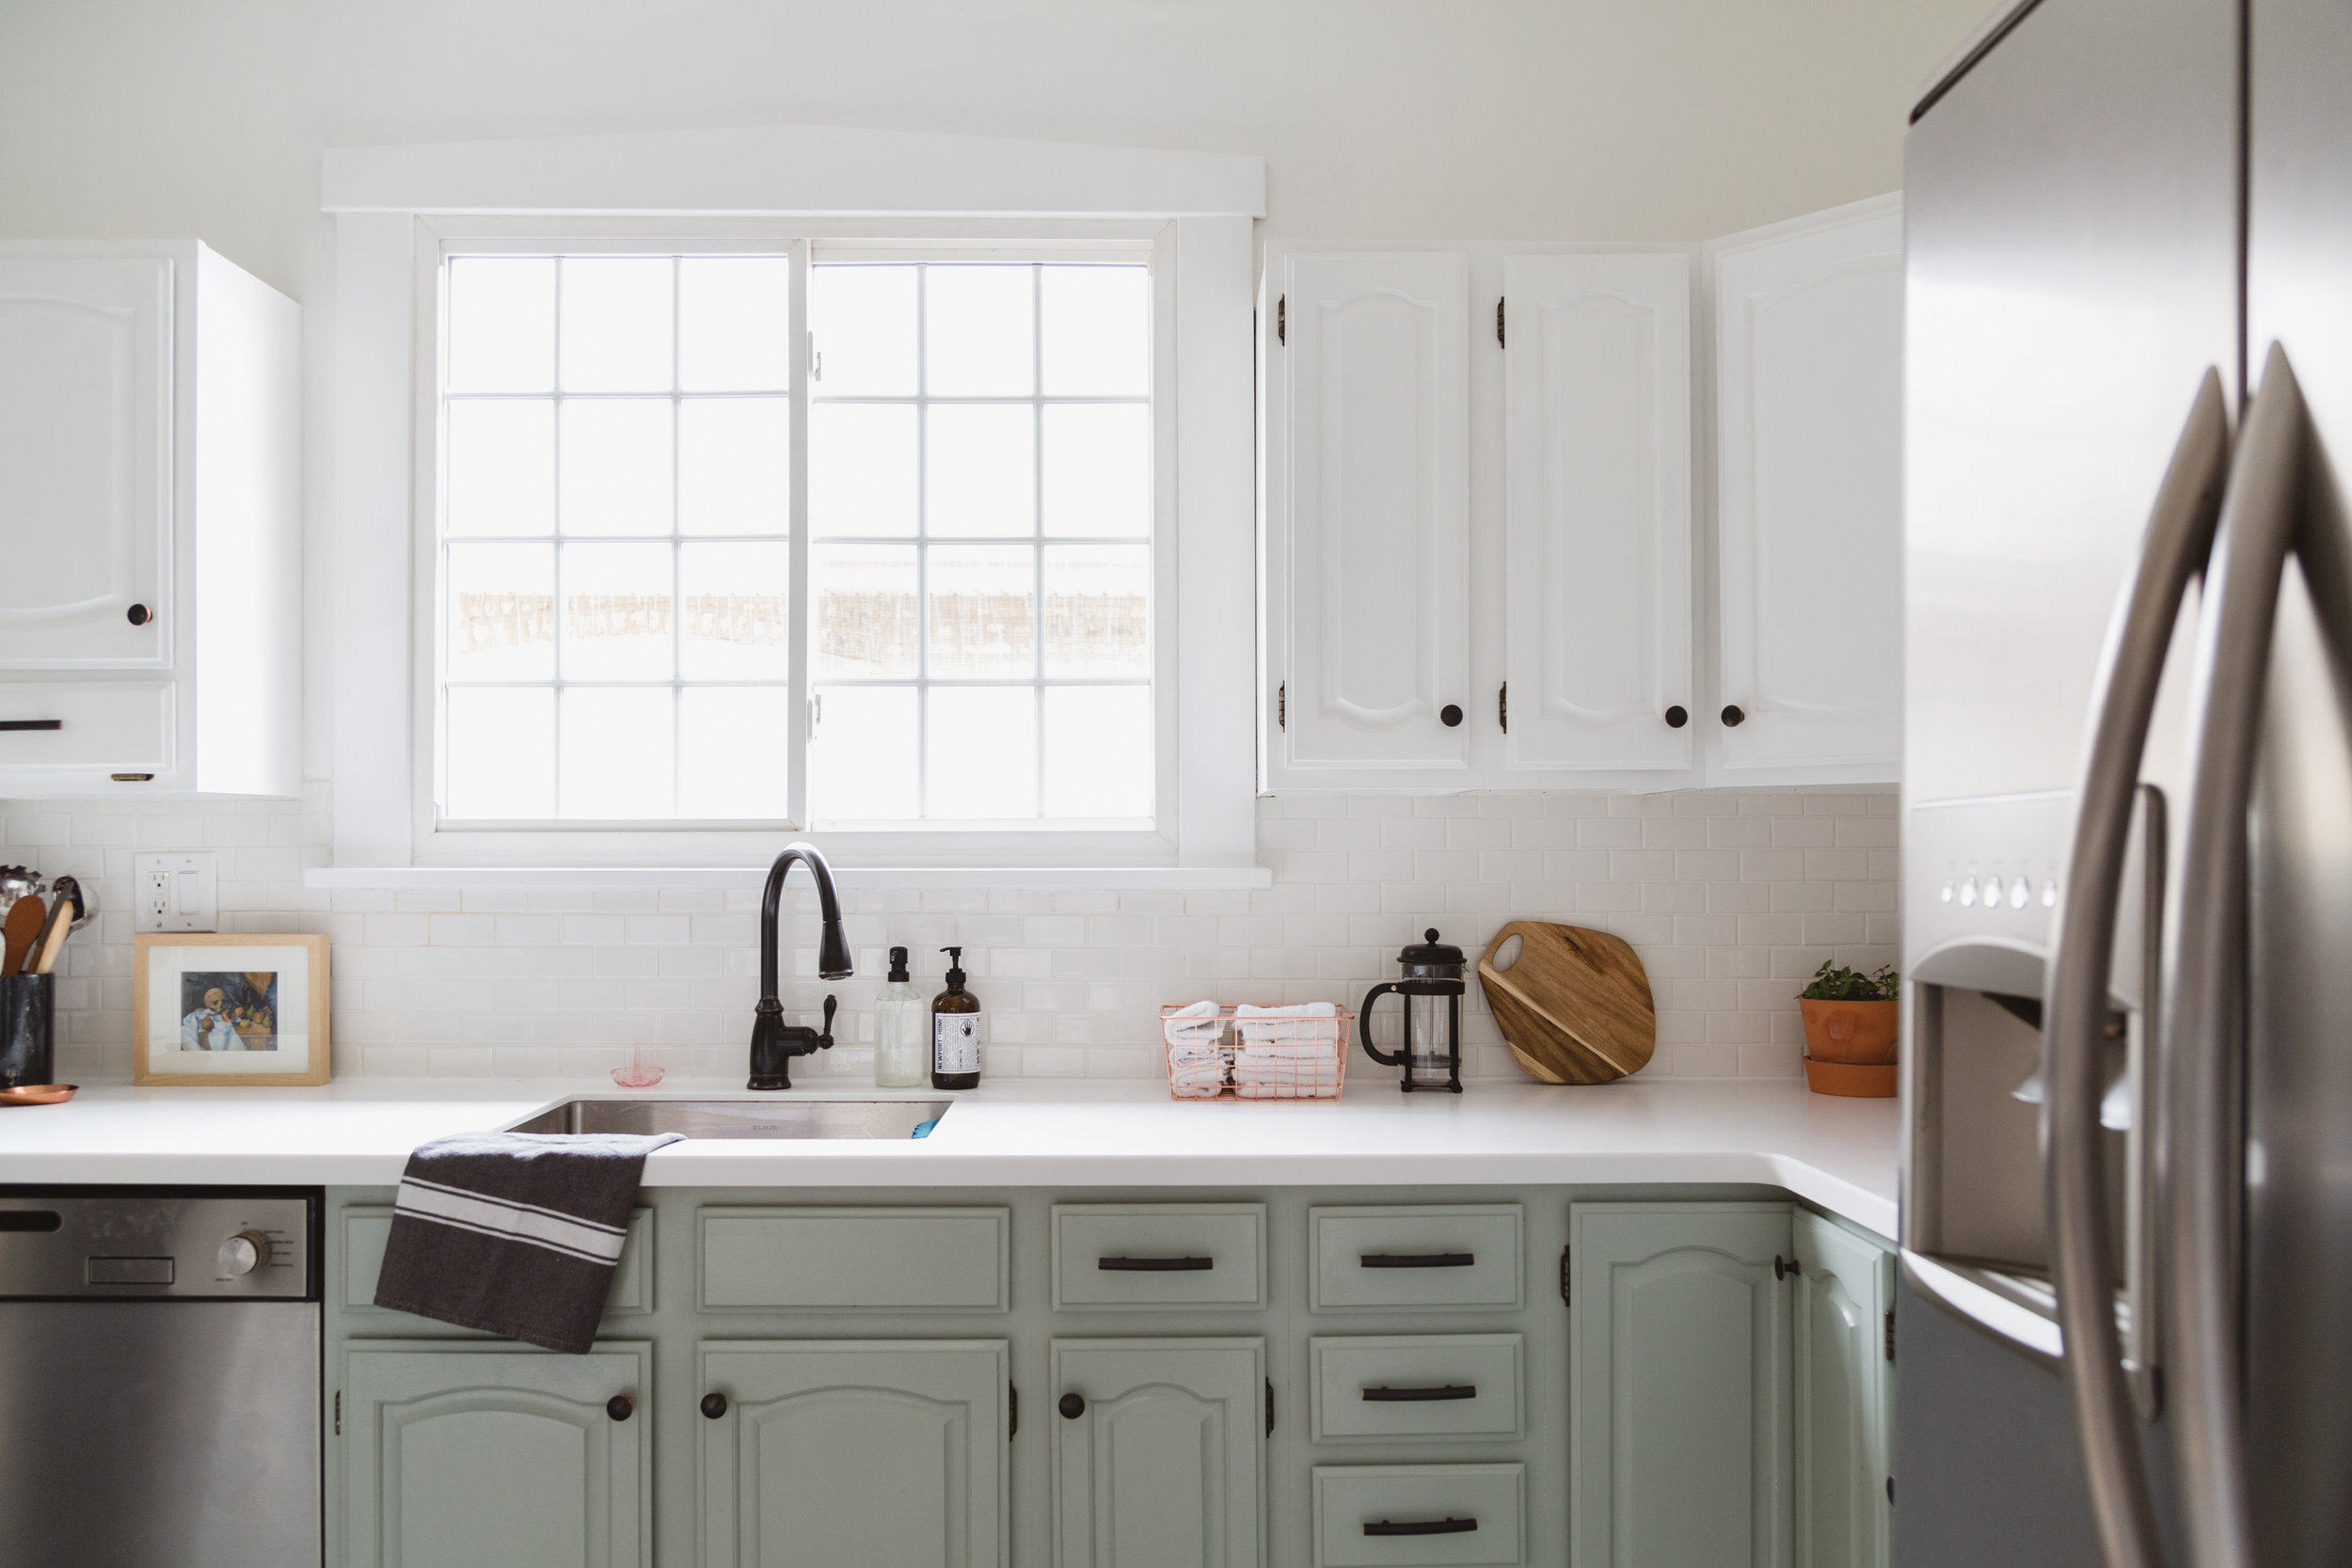
The following spring, we were ready to purchase a new countertop, which led to phase 2 of our makeover. The tile countertop had to go. Not only were the grout grooves annoying to clean, but the speckled look honestly made it hard to tell when it was dirty (Is that the tile pattern or did I spill coffee grounds everywhere?). I just wasn't great at wiping up crumbs when I didn't realize they were there. We considered several materials, but ultimately went with an acrylic solid surface. Alex felt adamant that it be durable and easy to maintain, and this fit that description as well as our price point (much more affordable than quartz). We chose a flush mount sink and antique bronzed/black faucet to be installed with the countertop. My dad removed the old countertop and the backsplash before installation, and my mom and I worked on painting the cabinets.

This is where you can see the curious fossil-style tile accents.
I’ve been surprised to realize that when people say they painted their cabinets, they are actually saying they had their cabinets painted, professionally. Which is fantastic and something that we looked into also, but since I didn’t love the style of the cabinets to begin with, the steep cost of having them done professionally was something I couldn’t wrap my mind around. While I fully admit the process was tedious, it was not impossible and in the end made a huge impact at an amazing price.
To begin, we removed all the doors and hardware and painted the doors in our garage on saw horses. We wiped everything with a deglosser and a degreaser, used one coat of primer, and two coats of paint on each. The uppers we painted Benjamin Moore Chantilly Lace (the white we used on the kitchen walls, as well as in our living room and upstairs hall) and on the bottom cabinets we used Benjamin Moore Misty Green. Because of the grooves in our cabinets, a brush worked best to fill every crevice. For the box cabinets attached to the wall, I was able to use a short roller brush. After we returned all the cabinet doors, we replaced the hardware with antique bronze hardware from Home Depot. Sometimes I wish we had picked out something beautiful from Rejuvenation, but I am happy with the cost of what we chose. They’re not perfect, but they’re a definite improvement and help bring the room together. I think I would save a splurge on hardware for a full kitchen remodel where I have chosen cabinets I love.

Me painting the cabinet bases. Please don’t judge me for leaving the dishes in the cabinets during this process.

A coat of paint on the cabinet bases and Plaster of Paris for wall patching. A half-hearted attempt to protect the dishes with towels.
After my dad removed the countertops, we had the countertop and sink installed by professionals. After an attempt at installing the faucet, we ran into a snafu with the way the single bowl fit with the pipes and disposal (since we previously had a double bowl sink) and ended up calling a plumber to make it all happen. My dad installed our new range and microwave. We added a small cabinet above the overhead microwave since we removed the previous one to make room for the microwave. It’s a cheap cabinet that doesn’t quite match the rest of the cabinets, but it’s quite close and painted to match, so we don’t find it to be noticeable.

Me helping my dad install this microwave but he is likely doing all the work/lifting
Phase 3 was the backsplash. Again with my dad's help, we were able to install this ourselves. We bought 2"x4" DATile subway tile from Home Depot. The tile was laid out on sheets for easy installation, and we rented a tile cutter from Home Depot to accommodate edges, corners, and outlets.


This past summer and fall, we finally made finishing touches (it’s quite hard to accomplish things quickly with 2 little kids, we are learning). First up was a window repair. This we had to outsource. When our new faucet was installed, we had to remove part of the window sill (a large sill that had been added on to the original) to accommodate the curved spout. What was left underneath was damaged and not something we could repair ourselves. We had an amazing carpenter from Punch List make the repair, and he ended up redoing the entire window frame to match the original window frame style of the house. My dad helped us out this fall by painting the undersides of the cabinets, something I should have done originally but didn’t occur to me. We would notice the dark undersides when sitting down at our dining room table and realized the needed to be white, too. He also put the final coat of white on the repaired window and fixed up the whole area with some silicone caulk to help keep the space around the sink mold- and leak-free.

You can see in this progress photo that the window sill was damaged from moving the larger piece. Further, there are distracting brackets at the top of the window frame, and the side pieces are actually door trim that don’t match the original style of the window.

The carpenter we worked with removed the entire frame and replaced it with a beautiful, cohesive frame (below)
Repaired window, finally!
Next was styling! We sold some kitchen items we didn’t need and try to keep the countertops clear, aside from a few daily essentials and some accessories. I purchased a black marble utensil holder to help break up all the white space. Black and white linens, a copper spoon rest, a black French Press, a wooden cutting board, cookbooks, and a potted plant also helped break up the white and provide warmth. A vintage rug provides color in front of the sink.
Our kitchen is now such a happy space and I'm really proud of the vision we had and how we executed it, knowing full well how fortunate we were to have so much help from my dad. Without his help we either would have spent a ton of money or just not done it at all and felt sad in our kitchen.
Photos of the updated kitchen are by Rachel Loewen. The before photos were taken by me.


Sources:
Upper cabinet color: Benjamin Moore Chantilly Lace
Lower cabinet color: Benjamin Moore Misty Green
Rug: Vintage


